
There are few things that can transform a living room quite like updating the fireplace. When my husband and I moved into our home, I knew it was one of the first projects I wanted to tackle. The original brick, dated fireplace grates, and orange-toned wooden mantel weren’t quite the look I envisioned for our home. I wanted something lighter, cleaner, and more timeless without completely losing the character of the original fireplace.
That’s when I decided to try whitewashing our brick fireplace with Romabio limewash.
I know that painting or whitewashing brick can be a controversial design choice. Some people love the fresh, updated look, while others prefer to preserve the natural brick. For us, whitewashing was the right decision for the style we wanted to create.
What I didn’t expect was that the process would involve a few mistakes, an unexpected change of plans, and a second round of limewash to get the look I had envisioned.
In this post, I’m sharing the before-and-after transformation, the products and supplies I used, how I applied the limewash, and what I would do differently if I were starting this DIY fireplace makeover all over again.
Before: An Outdated Fireplace With So Much Potential
When we first moved in, our living room needed quite a bit of updating. The bright blue walls and dated finishes weren’t reflective of my style, and the fireplace immediately stood out as one of the biggest opportunities to transform the space.
The yellow-gold fireplace grates and orange-toned wooden mantel made the entire fireplace feel dated. Since it was already the focal point of the room, I knew that updating it would make a significant difference in the overall look and feel of the space.
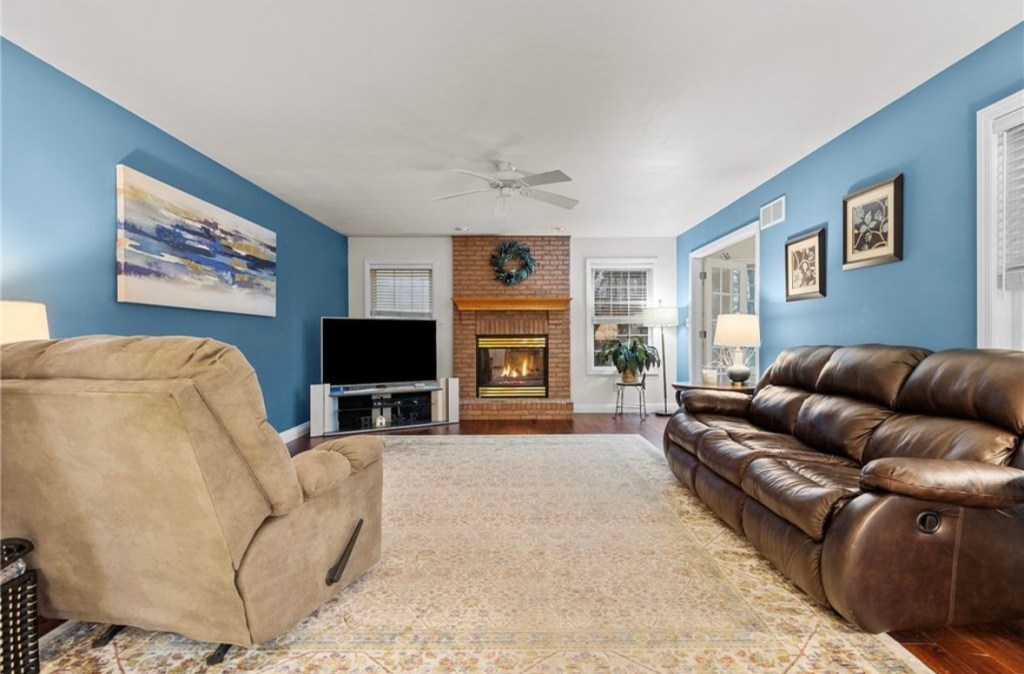
My goal wasn’t to completely gut the fireplace or spend a fortune on a renovation. I wanted to work with what we already had and use a few relatively simple DIY updates to make it feel more modern.
I decided to tackle three things:
- The brick: Lighten the orange and red tones with a whitewashed finish.
- The fireplace grates: Paint the gold metal a flat black for a cleaner, more modern appearance.
- The wooden mantel: Refinish the existing wood in a more neutral tone that complemented the rest of the room.
These changes allowed me to preserve the original structure of the fireplace while giving it an entirely different look.
Updating the Fireplace Grates and Wooden Mantel
Before starting the brick, I wanted to take care of the surrounding finishes. I figured that if I made any mistakes while painting or refinishing these areas, they could potentially be covered or blended in once I moved on to the limewash.
Looking back, I was glad I approached the project this way.
Painting the Gold Fireplace Grates Black
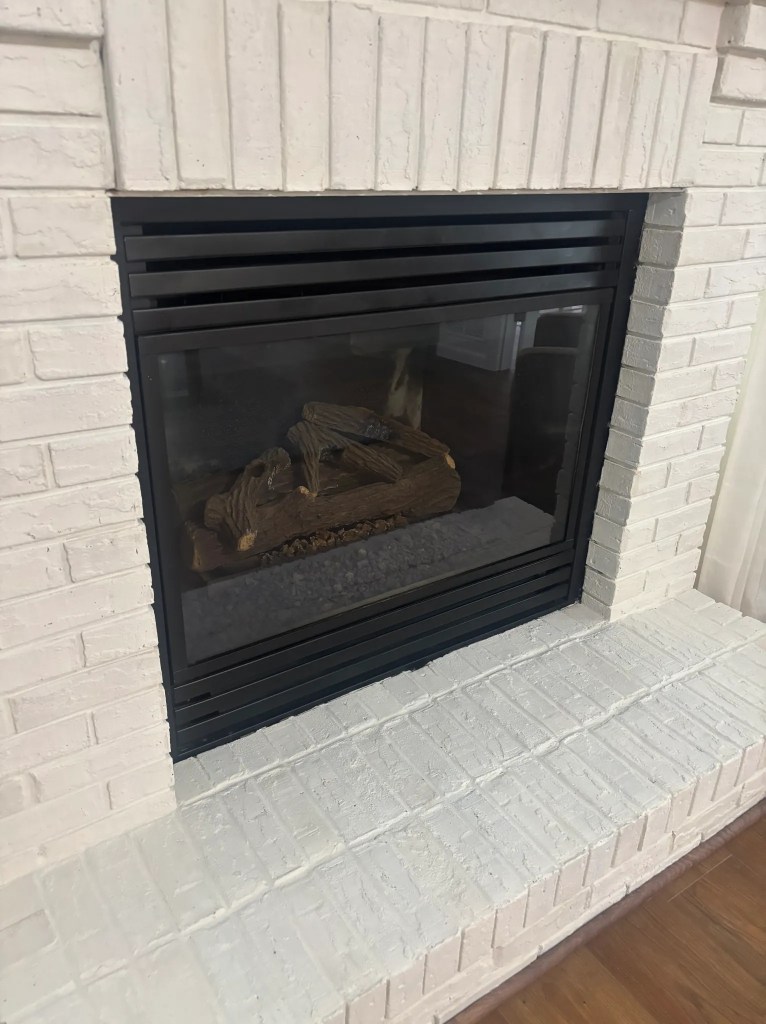
The original fireplace grates had a yellow-gold finish that felt out of place with the updated look I wanted. Rather than replacing them, I decided to see what a coat of flat black paint could do.
I used Rust-Oleum flat black paint to create a finish that complemented the existing black frame around the grates.
First, I cleaned the metal with warm water and a small amount of Dawn dish soap to remove any dirt or residue. Starting with a clean surface is important for paint adhesion and helps reduce the risk of peeling.
Once the grates were clean and prepared, I applied the paint according to the product directions.
This was one of the simplest changes in the entire project, but it made a noticeable difference. The black finish gave the fireplace a more streamlined appearance without the expense of replacing the existing components.
Shop this step: ShopMy Fireplace Collection
Important note: Choose paint specifically rated for your fireplace component and its operating temperatures. Follow the manufacturer’s preparation and application instructions, and never paint surfaces exposed to direct flame unless the product is specifically approved for that use.
Refinishing the Existing Wooden Mantel
The mantel presented a slightly different challenge. It was built directly into the brick, with electrical wiring and an outlet on top, so removing it wasn’t a practical option for this project.
Although replacing it with a more modern mantel was something I considered, I actually liked the unique, block-style design of the original woodwork. I thought refinishing it in a different color could help it feel intentional rather than dated.
My goal was to find a wood tone that complemented the flooring instead of competing with it.
I sanded off the original finish and used a water-based stain from Sherwin-Williams. One of my favorite parts of this process was working with their color experts to develop a stain that coordinated with the LVP flooring in our living room.
If you’ve ever tried to match wood tones, you know how difficult it can be to find the right shade. The first version of my stain pulled a little too red, so I went back and had the undertone adjusted. The final result was much closer to what I had envisioned.
Once I was happy with the color, I applied one coat of stain followed by two coats of water-based topcoat.
My biggest tip: If you’re trying to coordinate a wood mantel with existing flooring, bring a flooring sample to your paint or stain specialist if possible. Getting the undertones right can make a huge difference in how cohesive the finished room looks.
The Biggest Lesson: My First Attempt at Whitewashing the Brick Didn’t Go as Planned
With the mantel and grates updated, it was finally time to tackle the main event: the brick.
I had spent time looking at whitewashed fireplace ideas and had fallen in love with finishes that used multiple shades of limewash. Instead of creating a uniform white fireplace, these techniques used subtle variations in color to give each brick its own character.
I wanted to recreate that look.
I chose three different colors of Romabio limewash and began applying them to the brick. My plan was to use Avorio White as the base, then go back over selected bricks with the other colors to create a softly varied finish.
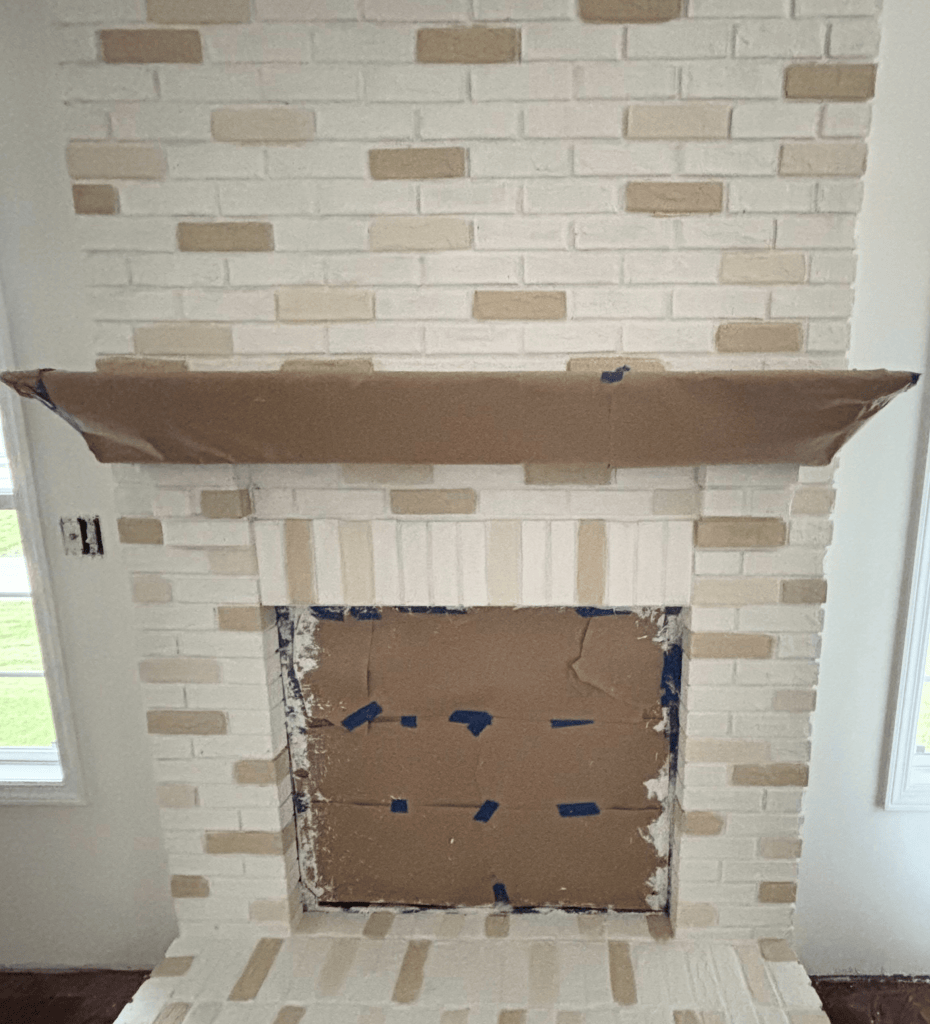
Unfortunately, the result wasn’t what I had pictured.
The contrast between the different shades was much more noticeable than I expected. Rather than looking naturally varied and softly aged, the individual bricks looked too distinctly different in color.
I realized that the beige tones needed to be more diluted to achieve the subtle effect I wanted.
At that point, I had two options: start over or find a way to soften the finish without losing all the work I’d already done.
I chose the second option.
I went back over the fireplace with a more diluted coat of Avorio White, allowing some of the contrasting shades to show through while softening the overall appearance. Thankfully, limewash is relatively forgiving, and the lighter color helped bring the different tones together.
This was probably the most important lesson I learned during the entire project: don’t panic if your limewash fireplace doesn’t look exactly how you imagined it while you’re working. The finish can look quite different as it dries, and additional applications may help you adjust the result.
That said, it’s much easier to build up a subtle finish gradually than to correct a color combination that has become too dramatic. If I were doing this again, I would start with a more diluted base and introduce any additional colors in very small amounts.
If you love a more uniform, classic whitewashed fireplace, using a single color is also a beautiful option. You don’t have to use multiple shades to achieve a fresh, updated look.
How to Whitewash a Brick Fireplace With Limewash
Whether you want a simple whitewashed finish or a more varied, layered appearance, the basic preparation and application process is similar.
For my project, I used Romabio limewash in Avorio White along with two additional colors for the initial multi-tone effect. Here’s what I used and how I approached the process.
Supplies You’ll Need
Before getting started, gather the following supplies:
- Mild dish soap and warm water
- Soft-bristle cleaning brush
- Spray bottle filled with water
- Masonry brush
- Romabio limewash or another suitable limewash product
- Bucket for mixing
- Measuring container for water
- Drop cloths and painter’s tape
- Gloves and other protective equipment recommended by the manufacturer
My supplies: I’ve linked the brushes and limewash products I used
Step 1: Clean the Brick
Preparation is an important part of getting a good result. Before applying limewash, I cleaned the entire fireplace using warm water, a small amount of Dawn dish soap, and a soft-bristle cleaning brush.
I worked gently across the brick to remove dust and surface grime without damaging the existing masonry.
Once the fireplace was clean, I moved on to preparing the limewash. However, don’t assume that cleaning and immediately painting will be appropriate for every fireplace. Check your product’s directions for drying requirements, and make sure the brick is sound and free of incompatible coatings, grease, and other contaminants.
If your brick has a glossy sealer or previously applied paint, additional preparation may be necessary.
Step 2: Mix the Limewash
I followed the dilution guidance provided by Romabio. For my batch, I used approximately 750 mL of water per quart of limewash.
This amount gave me good coverage while still allowing the finish to look like whitewashed brick rather than an opaque coat of paint.
In general, adding more water makes the limewash more diluted and can create a more translucent finish, while using less water tends to produce greater opacity. The final appearance will also depend on the brick itself, the color you choose, and the application technique.
I didn’t purchase a separate mixing tool for this project. Instead, I poured the quart of limewash into a bucket, added the water, and mixed everything thoroughly with my masonry brush.
A dedicated mixer may make the job easier, but using the brush worked for me.
My advice: Test your dilution on a small, inconspicuous area or a spare brick first. Let it dry completely before deciding whether you want more coverage or a more transparent finish. It’s much easier to adjust your technique before you’ve coated the entire fireplace.
Step 3: Apply the Limewash
For application, I used Romabio’s large masonry brush. Although it worked, I did wonder whether I could have achieved the same result with a more affordable masonry brush.
If you’re trying to keep costs down, compare brush options before purchasing the more expensive one.
I worked in small sections, lightly misting the brick with water from my spray bottle before applying the diluted limewash with the brush. I continued across the fireplace until the entire surface was covered.
The process took time, especially because I wanted to pay attention to the coverage and avoid creating an inconsistent finish unintentionally.
One thing worth knowing is that limewash can look much more translucent when it’s first applied than it does once it dries. The final color may take several hours to develop, depending on conditions and the product.
For that reason, I recommend allowing the finish to dry fully before deciding whether it needs another coat or any touch-ups.
In my case, I used a second, more diluted application of Avorio White to soften the contrast from my original multi-color attempt. This helped create the lighter, more cohesive look I wanted.
Always follow your specific limewash manufacturer’s instructions regarding dilution, application, drying time, and any additional coats.
Step 4: Step Back and Enjoy Your New Fireplace
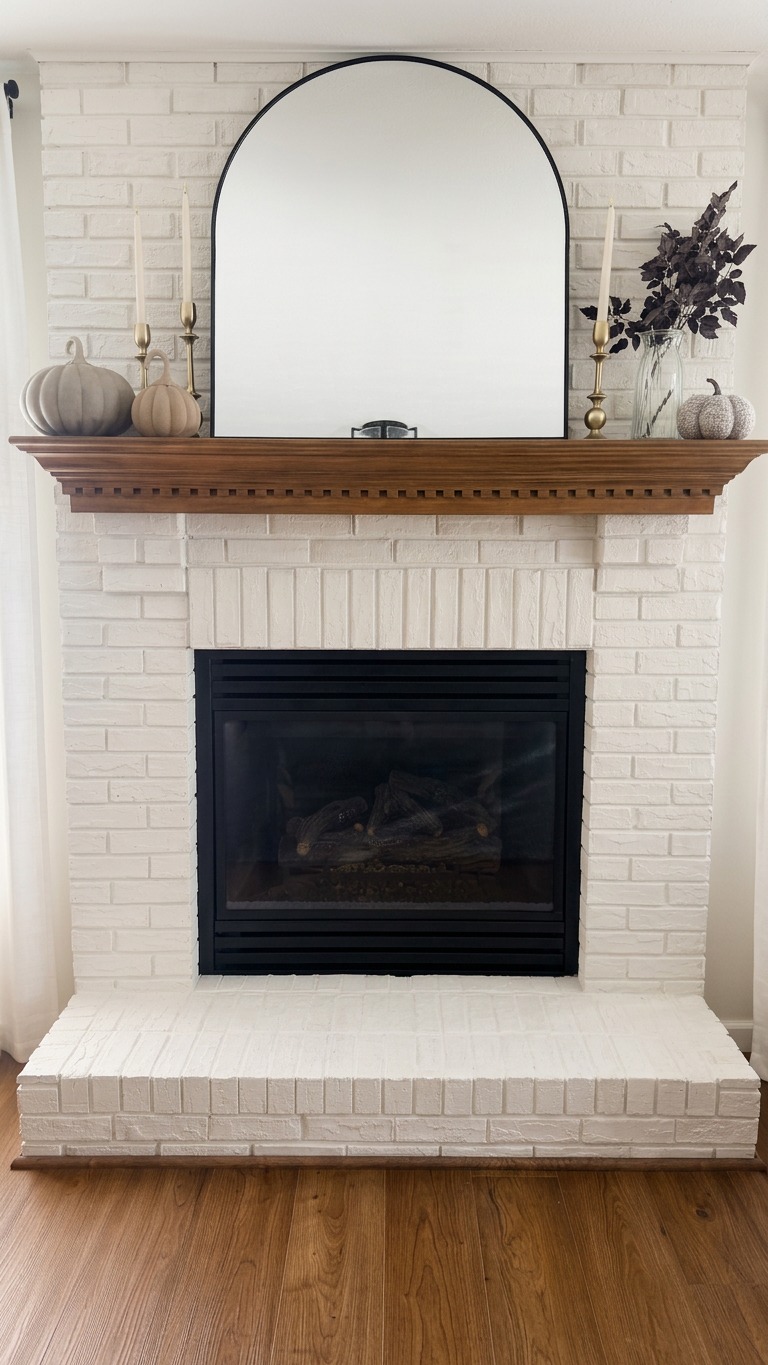
After all the preparation, painting, staining, and limewashing, the fireplace finally started to look the way I had envisioned when we first moved in.
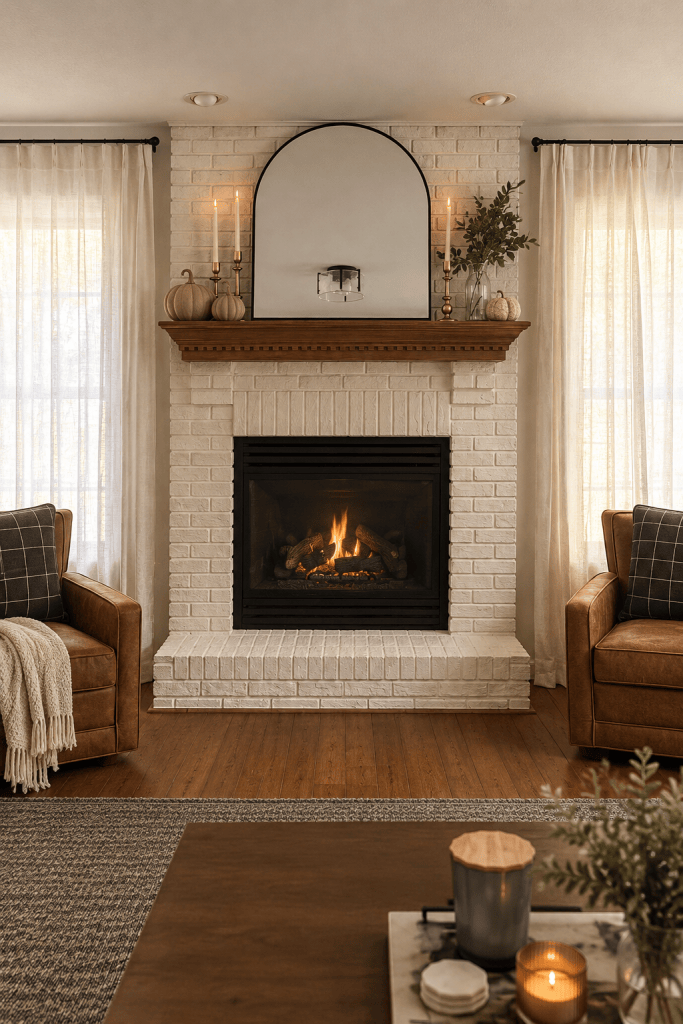
The lighter brick, black grates, and refinished mantel worked together to create a more cohesive look. Rather than replacing the entire fireplace, I was able to update the existing materials and preserve the original structure.
This is one of my favorite things about DIY home projects: sometimes a few thoughtful changes can make a space feel completely different.
The Final Result: Would I Whitewash a Brick Fireplace Again?
Absolutely. Although my first attempt at a multi-color finish didn’t turn out as planned, I’m happy with the final result and glad I chose limewash for this project.
If you’re considering whitewashing a brick fireplace in your own home, here are the biggest takeaways from my experience:
- Start with a test area. Limewash can dry differently than it looks when wet, so test your color and dilution before committing to the entire fireplace.
- Build up the color gradually. It’s easier to add more coverage than to correct a finish that has become too contrasting.
- Don’t overlook the surrounding finishes. Updating the mantel and fireplace grates helped the entire fireplace feel more intentional.
- Take your time matching wood tones. Getting the undertones right made a difference in how the mantel complemented the rest of the room.
- Be flexible with your original plan. DIY projects don’t always go exactly as expected, and sometimes the best result comes from making adjustments along the way.
Whitewashing brick isn’t the right choice for every home, but for us, it was an affordable way to create the lighter, more updated living room we wanted without undertaking a complete fireplace renovation.
If you’re planning a similar project, I hope seeing both my initial attempt and the finished result helps you feel more confident getting started.
Have you whitewashed a brick fireplace, or are you considering it? I’d love to hear about your experience in the comments!
Disclosure: This post may contain affiliate links. If you purchase through qualifying links, I may earn a commission at no additional cost to you. I only share products and resources relevant to my home projects and personal experience.




Leave a Reply